Do It Yourself: Make a USB Guitar For Your PC
Why would you want a USB port in an electric guitar? The answer is simple: convenience. By putting a small USB port and audio codec in a guitar, you’re adding an extra sound board. So when you record, your guitar is digitized locally and the signal is transmitted to your computer over a USB cable. The guitar retains all its standard analog capabilities but outputs to USB as well. Now you can rock steady until your hard drive is full. Here’s how to do it.
1. Select a Guitar
For this project I’ve selected a simple, well-made electric guitar and the Micro USB interface that’s bundled with M-Audio Session, a flexible home-recording package with many of the features of GarageBand (though it records only one track at a time).
The guitar is an SX STL Ash, a decent, inexpensive Telecaster inspired guitar from Rondo Music. A Tele-style guitar is ideal for my purposes: it has a bolt-on neck and lots of room in the control panel and under the pickguard if needed. The thickness of the lower edge provides a handy place to mount jacks without cluttering up the face of the guitar.

2. Which USB?
The Micro USB interface has two 1/8-inch jacks; one for guitar-in, the other for stereo headphone-out It has a short cord with a USB plug and can be opened easily with just your fingernails and a little pressure It also has a Micronas USB codec onboard, preconfigured to record a mono input at a 16-bit, 44.1 -kHz sampling rate-CD quality. The interface outputs the signal in both the left and right channels.

3. Measure Twice, Cut Once
Here’s an approximation of the jack and module layout, The Micro USB module fits easily into the control cavity. The topmost jack is the normal guitar analog output. I’ll change the stock jack (very inexpensive) to a rugged Switchcraft jack. The second jack was intended to be an auxiliary input jack, but that didn’t work out, because it wasn’t technically feasible to add a second lack for a microphone or another guitar. The third jack is a stereo headphone jack. For durability, I used a 1/4-inch jack. The female USB jack is from L-Com. It’s the smallest panel jack I could find, and I liked the chromed plastic shell. A mini USB connector wouldn’t be rugged enough, so I went with a full-size A-style connector.

4. Drill Your Holes
Strike a centerline with an adjustable square to lay out the holes precisely in the side of the guitar, and then drill 7/8-inch holes with a spade bit.

5. Ready the USB
Open the USB jack shell with a jeweler’s screwdriver. The jack and circuit board should then slide easily out of the shell. Cut the excess length off the circuit board and shorten the shell with a hobby Saw.

6. Wire Your Interface
Note which colors go where, remove the wires from the jack, and shorten the cable to make it fit within the guitar. Then strip and solder the wires from the module back into the female connector board.

7. Craft a Cover
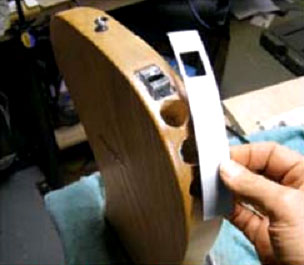
To protect your handiwork, make an aluminum cover plate for the jacks. I made the rectangular opening on a benchtop milling machine, but you can do as good a job by drilling the corners, cutting the straights with a coping saw, and filing the edges. You don’t have to recess the cover plate, but it looks better. I just held it in position and traced around it with a hobby knife to cut through the finish for subsequent routing and chiseling.

8. Not-so-Heavy Metal
Using the aforementioned benchtop milling machine, I drilled the 3/8-inch holes for the jacks with a step drill. Step drills are good for thin metal because they don’t catch in the metal and don’t create spiral flutes that pull or distort the work

9. Insert the Micro USB Board
I had originally intended to remove the jacks and solder directly to the Micro USB board, but decided that the jacks wouldn’t get any wear and tear inside the guitar. One connects to the volume control output, the other to the stereo headphone jack.

10. The Finished Product
Here’s the completed side panel-with the useless aux-in jack. I made the labels with a Dymo LabelWriter, using black-on-clear tape. Use a second nut or a spacer washer inside so the jack fits flush with the outside nut. There is a spacer and a lock washer behind the panel.

Tools and Components
SX STL Ash Guitar
$119.95 list, www.rondomusic.com
M-Audio Session
($59.95 list, www.amazon.com
USB panel Jack
$9.95, www.1-com.com
Switchcraft 11A jack (mono)
$1.49, www.telephoneparts.com
Switchcraft 12B Jack (stereo, for headphones)
$1.95, www.telephoneparts.com
Aluminum sheet
.032 inch thick, 6 by 12 inches (HW)
$3.99, Ace Hardware
Screw
Four, ½-inch lenght
from: PC Magazine
1. Select a Guitar
For this project I’ve selected a simple, well-made electric guitar and the Micro USB interface that’s bundled with M-Audio Session, a flexible home-recording package with many of the features of GarageBand (though it records only one track at a time).
The guitar is an SX STL Ash, a decent, inexpensive Telecaster inspired guitar from Rondo Music. A Tele-style guitar is ideal for my purposes: it has a bolt-on neck and lots of room in the control panel and under the pickguard if needed. The thickness of the lower edge provides a handy place to mount jacks without cluttering up the face of the guitar.

2. Which USB?
The Micro USB interface has two 1/8-inch jacks; one for guitar-in, the other for stereo headphone-out It has a short cord with a USB plug and can be opened easily with just your fingernails and a little pressure It also has a Micronas USB codec onboard, preconfigured to record a mono input at a 16-bit, 44.1 -kHz sampling rate-CD quality. The interface outputs the signal in both the left and right channels.

3. Measure Twice, Cut Once
Here’s an approximation of the jack and module layout, The Micro USB module fits easily into the control cavity. The topmost jack is the normal guitar analog output. I’ll change the stock jack (very inexpensive) to a rugged Switchcraft jack. The second jack was intended to be an auxiliary input jack, but that didn’t work out, because it wasn’t technically feasible to add a second lack for a microphone or another guitar. The third jack is a stereo headphone jack. For durability, I used a 1/4-inch jack. The female USB jack is from L-Com. It’s the smallest panel jack I could find, and I liked the chromed plastic shell. A mini USB connector wouldn’t be rugged enough, so I went with a full-size A-style connector.

4. Drill Your Holes
Strike a centerline with an adjustable square to lay out the holes precisely in the side of the guitar, and then drill 7/8-inch holes with a spade bit.

5. Ready the USB
Open the USB jack shell with a jeweler’s screwdriver. The jack and circuit board should then slide easily out of the shell. Cut the excess length off the circuit board and shorten the shell with a hobby Saw.

6. Wire Your Interface
Note which colors go where, remove the wires from the jack, and shorten the cable to make it fit within the guitar. Then strip and solder the wires from the module back into the female connector board.

7. Craft a Cover
To protect your handiwork, make an aluminum cover plate for the jacks. I made the rectangular opening on a benchtop milling machine, but you can do as good a job by drilling the corners, cutting the straights with a coping saw, and filing the edges. You don’t have to recess the cover plate, but it looks better. I just held it in position and traced around it with a hobby knife to cut through the finish for subsequent routing and chiseling.
8. Not-so-Heavy Metal
Using the aforementioned benchtop milling machine, I drilled the 3/8-inch holes for the jacks with a step drill. Step drills are good for thin metal because they don’t catch in the metal and don’t create spiral flutes that pull or distort the work

9. Insert the Micro USB Board
I had originally intended to remove the jacks and solder directly to the Micro USB board, but decided that the jacks wouldn’t get any wear and tear inside the guitar. One connects to the volume control output, the other to the stereo headphone jack.

10. The Finished Product
Here’s the completed side panel-with the useless aux-in jack. I made the labels with a Dymo LabelWriter, using black-on-clear tape. Use a second nut or a spacer washer inside so the jack fits flush with the outside nut. There is a spacer and a lock washer behind the panel.

Tools and Components
SX STL Ash Guitar
$119.95 list, www.rondomusic.com
M-Audio Session
($59.95 list, www.amazon.com
USB panel Jack
$9.95, www.1-com.com
Switchcraft 11A jack (mono)
$1.49, www.telephoneparts.com
Switchcraft 12B Jack (stereo, for headphones)
$1.95, www.telephoneparts.com
Aluminum sheet
.032 inch thick, 6 by 12 inches (HW)
$3.99, Ace Hardware
Screw
Four, ½-inch lenght
from: PC Magazine
Emërtimet: Do it youself
.
If you would like to donate to Ngadgeti Blog Please do so by visiting the Paypal button, any amount helps! Thanks to everyone who has helped so far!


Contact Ngadgeti Blog
Ngadgeti Home
Last Added
- 3Dconnexion SpacePilot: Interact with Your PC in a...
- Wacom Cintiq 21UX: Touch a Screen for Instant Crea...
- Canon Selphy CP740: Good, Cheap Photos
- Sony Bravia KDL-46V3000: Blur Sullies Colorful LCD TV
- Sandisk Sansa TakeTV: Video, from PC to TV, Easily
- T-Mobile Sidekick LX Review: Easy on the Eyes-And ...
- HP Photosmart A626 Compact Photo Printer: Photo Pr...
- Linksys NAS200: Home NAS on a Budget
- Toshiba Qosmio G45-AV680 Review: Heavyweight Lapto...
- Maxtor OneTouch 4 Mini: Disaster Recovery to Go
Advertise
Categories
- + News
- + Cellphone
- - Cellphone II
- - Cellphone III
- + Apple
- + Smartphone
- - Smartphone II
- + iPod and accessories
- + Notebook/Laptop
- - Notebook/Laptop II
- - Notebook/Laptop III + Tablet PC
- + UMPC
- + Digital Camera
- - Digital Camera II
- - Digital Camera III
- + Digital Life
- + DSLR Camera
- + LCD
- + LCD II
- + HDTV
- + Camcorder
- + GPS
- + PDA Phone
- + Peripheral
- + Miscellaneous
- - Miscellaneous II
- + Printer
- + MP3 Player
- - MP3 Player II
- + Portable Media Player
- + Speaker
- + Storage
- + Storage II
- + Projector
- + Toy and Robots
- + Wireless
- + Headset
- + Media Streaming
Popular
- IRIVER CLIX GEN 2: It's All You Need?
- Toshiba Portege R500: Sexy and Slim Laptop
- Toshiba Portege M700 and Dell Latitude XT Review
- T-Mobile Wing: Windows Mobile 6 Blue Smartphone
- LG Viewty (KU990) Review: Touch screen in Camera P...
- Iriver Mplayer: Mickey Mouse MP3 player
- Sony Ericsson W580i: Music Phone Comes With Sporty
Comments on "Do It Yourself: Make a USB Guitar For Your PC"
post a comment